Asynchronous queries and DTOs (sample WebAPI application)
This topic discusses server-side asynchronous queries and the use of DTOs (Data Transfer Objects) through an example application. The web application is an ASP.NET Core WebApi server using Entity Framework data access. The functionality discussed here is the management of a webshop cart.
Author
The original author of this lecture note in Hungarian is Máté ZERGI.
Asynchronous execution
Most of our web applications use a database. When communicating with the database, we have to be aware that:
- the database might not always be available,
- the connection might not be stable and fast,
- and the database might be slow to respond.
Therefore, we need to prepare to wait for the results queried from the database in our application. Using asynchronous techniques in the web application, we can make sure that the resources, such as the web server's threads, are used efficiently even while waiting for the database.
Asynchronous execution vs. concurrent execution
Asynchronous execution is not the same as concurrent execution. A web server always processes incoming requests concurrently (i.e., multiple requests are in the system at all times). On the other hand, asynchronous execution is about handling a single request efficiently by not blocking any thread for waiting to complete an I/O operation (such as database access, file access, or network communication).
The database of the sample application
The sample application presented here uses a simplified database structure as follows.
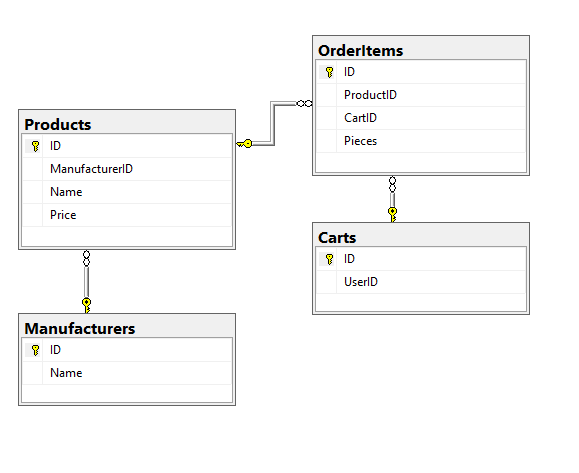
For simplicity, the UserId of the carts is not a foreign key to a Users table, but a fixed constant of 1. Obviously, in a real-life example, UserId would be a foreign key.
The Products stores the things the webshop sells; the Manufacturers contain the producers of these products; finally, OrderItems stores the content of the cart.
Server application
We would like to create a REST-compatible service for managing the webshop cart using ASP.NET Core WebApi and Entity Framework. Let us follow these steps:
- Create the C# model of the database tables,
- Create the database context,
- Create Data Transfer Objects that represent the information queried by the client in a format convenient for the client,
- Create WebApi controllers
We will go through each of these steps.
Create the C# model of the database tables
The C# classes that map the database tables are usually placed into a folder often called Models in ASP.NET Core.
The following is the class for the Products table.
namespace WebshopApi.Models
{
    public class Product
    {
        public string Name { get; set; }
        public int ManufacturerID { get; set; }
        public int Price { get; set; }
        public int ID { get; set; }
    }
}
The following is the class for the Manufacturers table.
namespace WebshopApi.Models
{
    public class Manufacturer
    {
        public string Name { get; set; }
        public int ID { get; set; }
    }
}
The following is the class for the OrderItems table.
namespace WebshopApi.Models
{
    public class OrderItem
    {
        public int ID { get; set; }
        public int ProductID { get; set; }
        public int CartID { get; set; }
        public int Pieces { get; set; }
    }
}
The following is the class for the Carts table.
namespace WebshopApi.Models
{
    public class Cart
    {
        public int ID { get; set; }
        public int UserID { get; set; }
    }
}
Note, that the sole purpose of these classes is to map the data exactly as in the database.
Create the database context
After mapping the tables, we can now create the class that will represent our database: the DbContext class. This class must inherit from the Entity Framework Core DbContext class.
namespace WebshopApi.Models
{
    public class WebshopContext : DbContext
    {
        public WebshopContext(DbContextOptions<WebshopContext> options)
            : base(options)
        {
        }

        public DbSet<Product> Products { get; set; }
        public DbSet<Manufacturer> Manufacturers { get; set; }
        public DbSet<Cart> Carts { get; set; }
        public DbSet<OrderItem> OrderItems { get; set; }
    }
}
Each table in the database corresponds to a DbSet property as defined above. Each DbSet specified the type of the entity it stores; e.g., DbSet<Products> will store entities of type Product.
The DbContextOptions configures the access to the database, such as the connection string. This is usually configured in the Startup class:
public class Startup
{
    // ...

    // This method is called by the runtime to populate the services of the DI container
    public void ConfigureServices(IServiceCollection services)
    {
        services.AddDbContext<WebshopContext>(opt =>
                opt.UseSqlServer(@"Data Source=(localdb)\mssqllocaldb;Initial Catalog=Webshop;Integrated Security=True"));
        // ...
    }
}
Defining Data Transfer Objects
We have the direct mapping of the database into C# classes. Let us now consider how does the cart of the webshop usually look like: it may contain multiple items. While the OrderItem class can represent a single item, our cart is a list of items. This list of items is what we shall describe with a so-called Data Transfer Object: it is a class that gathers data for the client.
Definition: Data Transfer Object
A container object that transfers data between application (here: between the client and the server).
With the use of DTOs, we can pack all necessary information into one object, making it not only more convenient for the client, but also better in terms of performance:
- We only send information to the client that it really needs.
- Furthermore, a DTO can gather various information and send them all in one go.
Let us consider, what information do we need to display the cart in the client: the products, the amount in the cart for each, and the total number of items.
-
Class
OrderItemhas superfluous data that the client does not need:CartIDandID. Removing these properties we can arrive at a class very similar toOrderItem; but it is still just one item of the cart. The class we can create this way is calledCartItem. -
This
CartItemhas aProductthat also stores some unnecessary data, and some properties that might need adding. For example, the manufacturer of theProductshould contain the name of the manufacturer and not theManufacturerID. Let us, therefore, create a newProductclass, and ourCartItemshould store this class instead. -
These
CartItemobjects are gathered in a list, and let us add the total number of items in the cart. This will give us our last DTO, theUserCart. An instance of thisUserCartis what that the client will receive.
The DTO classes are usually separated from the database entities. Let us put these classes in a DTOs folder.
CartItem class contains the data from an OrderItem without the unnecessary properties.
namespace WebshopApi.DTOs
{
    public class CartItem
    {
        public Product Product { get; set; } // This is the product that no longer has the ID of the manufacturer, but the name instead
        public int Amount { get; set; } // The amount in the cart
    }
}
The matching Product DTO:
namespace WebshopApi.DTOs
{
    public class Product
    {
        public string ProductName { get; set; } // The product name, e.g., AB123 Full HD TV
        public string Manufacturer { get; set; } // A !!name!! of the manufacturer, e.g., BMETV
        public int Price { get; set; } // Price of the product
        public int ID { get; set; } // ID of the product
    }
}
Why is there an ID here?
We might be curious why there is an ID here. An item in the cart is identified by the product itself. E.g., further details of the product in the cart can be queried by knowing this ID. We could create a new identifier for the item in the cart; but the product's ID is sufficient.
UserCart collects all items, and adds a total number.
namespace WebshopApi.DTOs
{
    public class UserCart
    {
        public List <CartItem> CartPieces { get; set; }
        public int NumberOfItems { get; set; }
    }
}
By storing the CartItems in a list, we make the job of the client easier. When rendering the contents of the cart the client code only needs to iterate through the array contents.
This UserCart is created by gathering the required information, such as the product details, then adding up the number of items.
Creating the WebApi controller
The controllers are usually placed into the Controllers folder. Here, we have a single controller that uses the WebshopDbContext directly and handles the HTTP queries.
This is where we can introduce asynchronous queries. Let us see an example right away:
The following is a GET query to fetch all carts.
[HttpGet]
public async Task<ActionResult<IEnumerable<Cart>>> GetCarts()
{
    var carts = await _context.Carts.ToListAsync();
    return carts;
}
Let us note the async keyword in the declaration and the Task return type, along with the await instruction in the body. Together, these are called async-await. Let us make sense of all these:
- The method returns a list of
Cartinstances, that is,IEnumerable<Cart>; - Which, according to WebApi controller conventions, is wrapped in an
ActionResult; - And this whole thing is wrapped in a
Task. This one is due to the asynchronous behavior.
Although this seems complicated, every part of this is for a different reason. Let us examine the asynchronous behavior: the Task type, and the await keyword. This definition of the method yields a so-called promise (some languages use this terminology) that represents the result of a task that will be completed in the future.
Why do we need this? Because this makes the execution of the controller method asynchronous. When the execution arrives at an await keyword, the thread that processes the request, will stop further processing of this query and will start processing a new query instead. Ok, but again, why? Because we know that the operation "behind" the await will take time: it has to go to the database and fetch data from there. If the thread stopped here to wait for the result, it would be wasting resources. Instead of having the thread wait for the result, the task is handed off to a system in the background (the operating system and the .NET asynchronous I/O subsystem - will not go into details here), and we request notification when the results are available. Once this happens (the results from the database are, in fact, ready), the processing of the query will continue.
In other words, the threads used by our application will always do useful work instead of waiting (or being suspended due to waiting). Consequently, this means that serving the HTTP requests need fewer operating system threads, therefore making better use of available computational resources.
The previous method can be simplified in syntax by getting rid of the local variable and returning the Task directly. Functionally, this implementation works (almost) identically, but the one above makes the explanation easier.
[HttpGet]
public Task<ActionResult<IEnumerable<Carts>>> GetCarts()
{
    return _context.Carts.ToListAsync(); // no await and the method declaration has no async
}
The ***Async methods
The methods to fetch data from the database (e.g., ToList, First, All, Find, etc.) all have their ...Async pairs. These methods provide the basis for asynchronous execution.
We will not discuss the execution in more details. What we need to remember, is that in order for our controller method to be asynchronous, there must be an asynchronous operation "underneath" (here: in Entity Framework).
Let us also see a complex example: gather all data of the cart:
[HttpGet("{id}")]
public async Task<ActionResult<UserCart>> GetCart(int id)
{
    // asynchronous query to find the cart
    var cartRecord = await _context.Carts.FindAsync(id);

    if (cartRecord == null)
        return NotFound();

    // build the query
    var productsquery =
        from p1 in _context.Products
        join m1 in _context.Manufacturers on p1.ManufacturerID equals m1.ID
        select new Product(p1.ID, m1.Name, p1.Name, p1.Price); // create the Product DTO
    // asynchronous evaluation
    var products = await productsquery.ToListAsync().ConfigureAwait(false);

    // asynchronous request to get order items
    var orderitemsquery = from oi in _context.OrderItems
                          where oi.CartID == cartRecord.ID
                          select oi;
    var orderitems = await orderitemsquery.ToListAsync().ConfigureAwait(false);

    // further operations are synchronous, as every result in in memory already

    // Find the products in the cart
    // match them to the order items and create a CartItem DTO
    var cartitems = products.Join(orderitems, p => p.ID, oi => oi.ProductID,
                                  (p, v) => new CartItem(p, v.Pieces)).ToList();

    // Finally, the result is a UserCart DTO
    return new UserCart()
    {
        CartPieces = cartitems,
        NumberOfItems = cartitems.Count()
    }
}
Note, how all asynchronous method calls are await-ed! But once we have all the data from the database, we can continue in a synchronous fashion.
The ConfigureAwait method
The ConfigureAwait(false) gives us further options regarding performance optimization. With this option we signal that the await-ed result set can be processed by any available thread, not just the one that started the processing originally. In server-side applications this is usually the correct behavior, however, this is not true for all asynchronous operations (e.g., UI threads are usually special and in that case not any thread can continue). For more details, see: https://devblogs.microsoft.com/dotnet/configureawait-faq/.
Finally, let us see an example using FirstOrDefaultAsync to process a POST query that alters the contents of the cart (adds or removed items):
// DTO describing the inputs of the operation
namespace WebshopApi.Models
{
    public class PostCartItemArgs
    {
        public int CartId { get; set; }
        public int ProductId { get; set; }
        public int Amount { get; set; }
    }
}

//////////////////////////////////////////////////////////////////////////////

// The HTTP handler in the controller
[HttpPost]
public async Task<IActionResult> PostCartItem([FromBody] PostCartItemArgs data)
{
    // find the cart by ID
    var cart = await _context.Carts.FindAsync(data.CartId).ConfigureAwait(false);

    if (cart == null)
        return NotFound();

    // find the order items in this cart matching the provided product
    var orderitemquery = from oi in _context.OrderItems
                         where (oi.CartID == data.Id && oi.ProductID == data.ProductId)
                         select oi;

    // FirstOrDefault so that if there is no match, the result is null
    var orderitem = await orderitemquery.FirstOrDefaultAsync().ConfigureAwait(false);

    if (orderitem == null)
    {
        // If there was no such item in the cart, add a new OrderItem
        _context.OrderItems.Add(new OrderItems { CartID = data.Id, Amount = data.Amount, ProductID = data.ProductId });
    }
    else
    {
        // If there is an item in the cart
        orderitem.Amount += data.Amount;

        // If the amount is zero, it means, removed from the cart
        if (orderitem.Amount == 0)
            _context.OrderItems.Remove(orderitem);
    }

    await _context.SaveChangesAsync(); // await here too, since this will need to go to the database
    return NoContent();
}
Who waits for the Task result of the controller?
Every async method has to be await-ed somewhere. When it comes to a WebApi controller, it will be the ASP.NET Core framework that invokes this method, and it will "wait" for the result before serializing it to JSON to send to the client.
Sample code
The source of the sample application is available here: https://github.com/mzergi/WebshopApi/